How to Download Meesho, Amazon & Flipkart GST Reports and Generate GSTR-1 JSON with GSTWali
- Download: Meesho (
tcs_sales.xlsx+tcs_sales_return.xlsx), Amazon (MTR B2B + B2C), Flipkart (GSTR Return Report.xlsx). - Upload to GSTWali: Import all files under one GSTIN. Reconcile sales, returns, and TCS with 1-click.
- Generate JSON: GSTWali auto-populates Tables 7, 12 (HSN), 13 (Docs), and 14/15 (E-commerce).
- File on GST Portal: Upload JSON via Returns Dashboard → GSTR-1 → Prepare Offline, review, submit, and file with OTP.
Table of Contents
- What Changed in GSTR-1 Recently (Read This First)
- Part 1: Download Your Meesho GST Reports
- Part 2: Download Your Amazon GST Reports
- Part 3: Download Your Flipkart GST Report
- Part 4: Your Files Checklist
- Part 5: Generate Your GSTR-1 JSON in GSTWali
- Part 6: Upload JSON to gst.gov.in
- The Complete Monthly Workflow
- E-Commerce GST Filing Checklist
- Frequently Asked Questions
If you sell on Meesho, Amazon or Flipkart, preparing your monthly GSTR-1 can be confusing.
You have to download the correct marketplace reports, account for customer returns, check GST values, prepare statutory tables, and finally upload the JSON file to the GST Portal.
Instead of manually copying thousands of transactions into Excel spreadsheets, you can use GSTWali to convert supported marketplace reports into a validated GSTR-1 JSON file ready for instant upload.
Important: Marketplace dashboards update frequently. The screenshots in this guide are visual references — always follow the exact labels currently shown in your seller account.
What changed in GSTR-1 recently (read this first)
If you last filed a year or two ago, four statutory updates are now in force:
- Table 12 (HSN summary) is split into two tabs — B2B and B2C. HSN summary details for B2B and B2C supplies are entered separately under each tab.
- HSN codes must be picked from a dropdown. Manual typing is no longer permitted. HSN is mandatory for B2B supplies, and optional for B2C where turnover was up to ₹5 crore in the previous financial year.
- Table 13 (document summary) is mandatory. You must report document types and counts, including invoices and credit/debit notes.
- GSTR-3B is now locked to your GSTR-1. From the July 2025 tax period, GSTR-3B's outward liability is hard-locked to the figures reported in GSTR-1, and Tables 3.1 and 3.2 are non-editable — errors have to be fixed in GSTR-1A before you start GSTR-3B.
The practical takeaway: your GSTR-1 is no longer a draft you can quietly correct later in 3B. Getting the marketplace data right at this stage matters more than it used to.
One more deadline to keep in mind — returns can no longer be filed after three years from their original due date. Once that window closes the portal blocks the period permanently.
Part 1: Download Your Meesho GST Reports
Which Meesho files do you need?
| File | Purpose | Required? |
|---|---|---|
tcs_sales.xlsx | Sales / forward transactions | Required |
tcs_sales_return.xlsx | Returned transactions & credit notes | Required |
Tax_invoice_details.xlsx | Invoice & credit-note mapping | Optional (recommended) |
The first two come from Meesho's GST Report download. The Tax Invoice file is downloaded separately through the Tax Invoice option.
Sales and returns provide the transaction and tax figures. The tax-invoice file maps those transactions to invoice and credit-note numbers, which is what fills Table 13 (Documents Issued) properly. You can file without it, but your document summary will be thinner.
Step 1: Open the Meesho Supplier Panel
Open the Meesho Supplier Panel from a desktop browser and log in. Use the desktop web version rather than the app — report export tools are far easier to access on desktop.
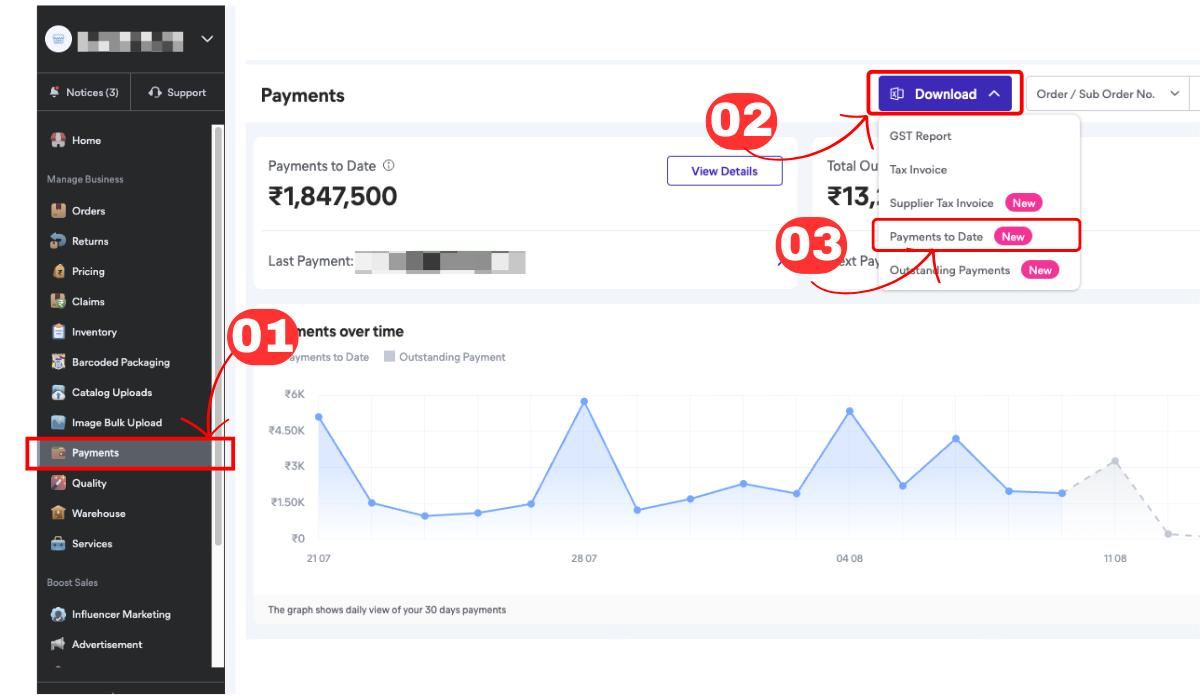
Step 2: Go to Payments, then click Download
From the left menu, under Manage Business, click Payments. On the Payments page, find the Download button near the top right and click it. A dropdown opens with the available report types.
Step 3: Select GST Report
From the Download dropdown, choose GST Report. The same menu also holds Tax Invoice, which you will need in Step 6.
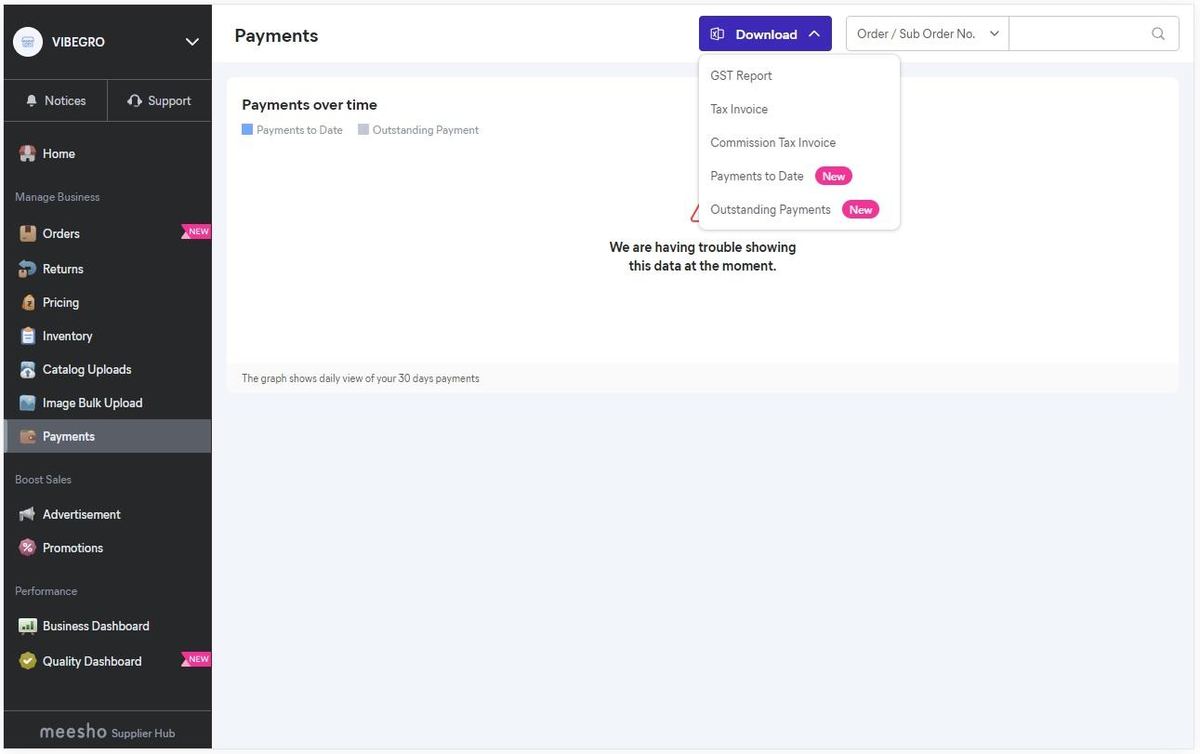
Note: The exact list of options varies between accounts. Some sellers see Supplier Tax Invoice, others see Commission Tax Invoice. You only need GST Report and Tax Invoice.
Step 4: Select the Year and Month
A GST Report modal appears. Pick the Year, then the Month, then click Download. Always select the month you are actually filing for — if you are filing July's GSTR-1, download July's report, not the current month.
Step 5: Extract the ZIP
The Meesho GST report downloads as a ZIP file. Extract it on your computer. Inside you'll find the two files you need:
tcs_sales.xlsxtcs_sales_return.xlsx
Do not rename them and do not resave them in Excel — GSTWali reads the original column structure directly.
Step 6: Download the Tax Invoice file
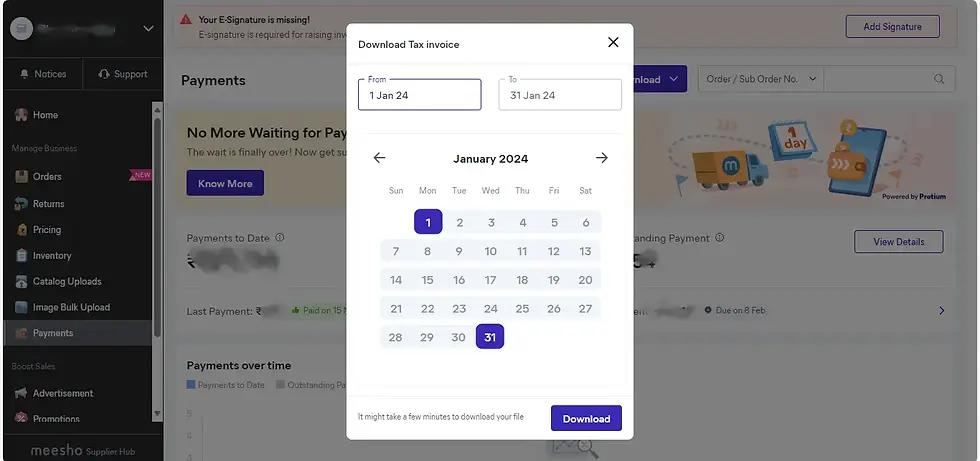
Go back to Payments → Download → Tax Invoice. A date-range picker opens. Select the first to the last day of your filing month — for example, 1 July to 31 July — and click Download. Meesho notes that this file can take a few minutes to generate.
The single most common Meesho filing mistake is uploading only tcs_sales.xlsx. Your returns reduce your net taxable turnover. If you file sales without returns, you will overstate your liability and pay more GST than you owe — and your figures will not reconcile against Meesho's GSTR-8.
Part 2: Download Your Amazon GST Reports
Amazon provides GST reports through Seller Central's tax reporting area. Depending on your account, you'll see GST Monthly Reports, GST On Demand Reports, or both.
Step 7: Open GST Reporting in Seller Central
Log in to Amazon Seller Central and go to Reports → Tax Document Library (some accounts display this as Reports → GST Reporting).
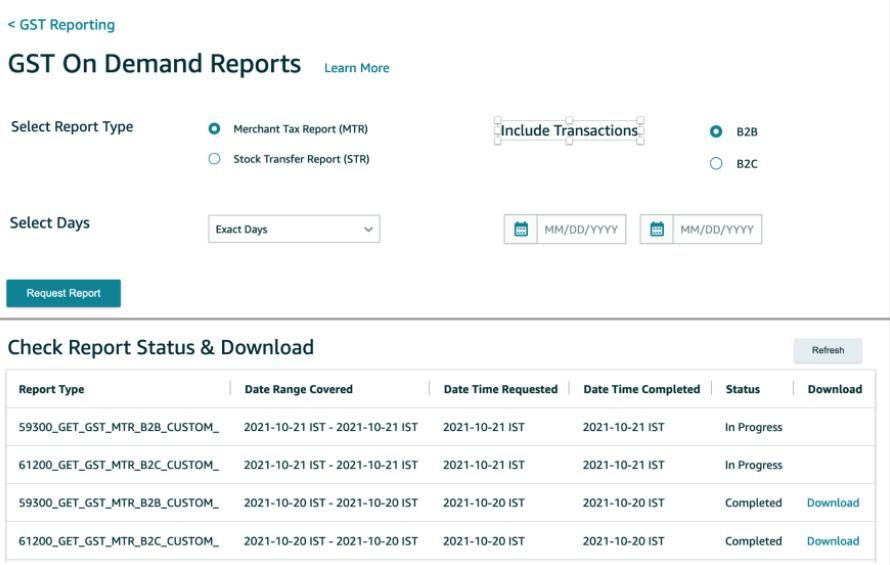
Step 8: Choose Merchant Tax Report (MTR) and the period
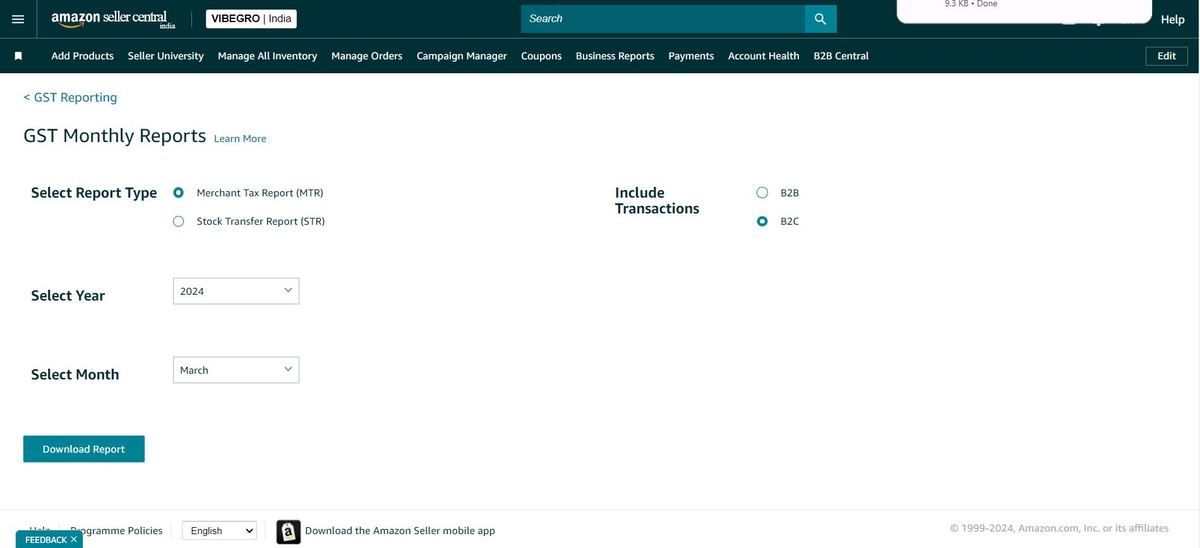
On the GST Monthly Reports screen, configure:
- Select Report Type → Merchant Tax Report (MTR)
- Include Transactions → B2B or B2C
- Select Year and Select Month
- Click Download Report
You must perform this step twice — once with B2B selected, and once with B2C. The radio button only allows selecting one at a time.
If you need a custom date range instead of a whole month, use GST On Demand Reports. Click Request Report, and the file appears in the Check Report Status & Download table once Amazon finishes generating it (status changes from In Progress to Completed).
Step 9: Keep both MTR files
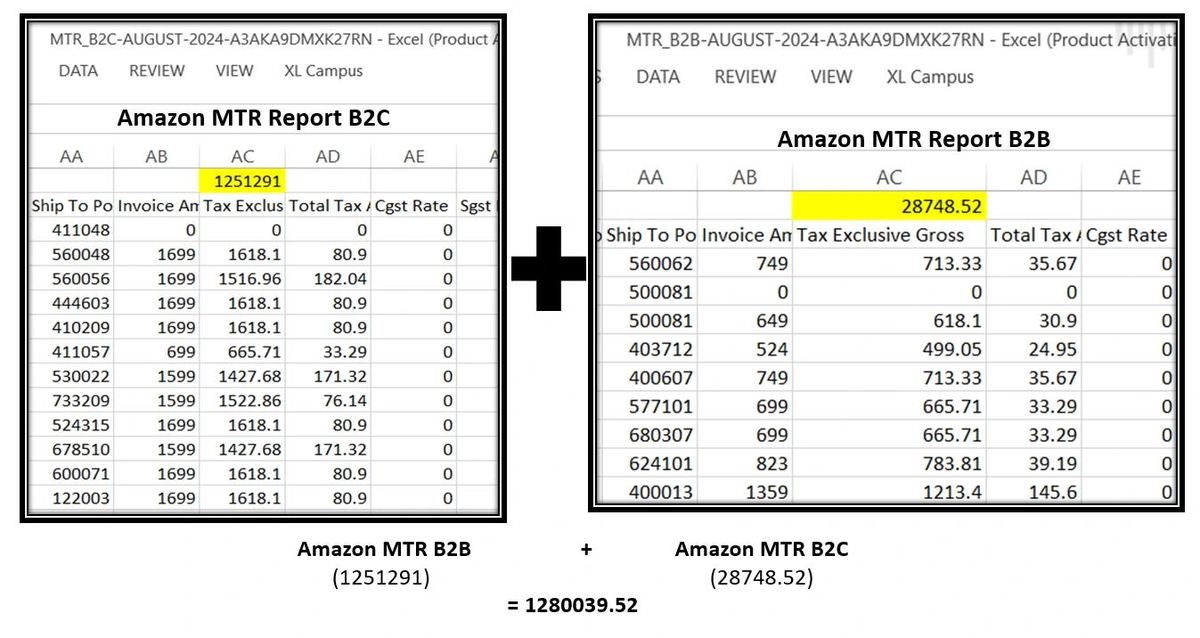
You will now have two files — MTR B2B and MTR B2C. Keep them in their original format. Between them, they cover your complete gross and net sales for the month.
Part 3: Download Your Flipkart GST Report
Flipkart works differently. You don't download a ready-made static report — you request it, wait for background generation, and then download it.
Step 10: Open Reports in Flipkart Seller Hub
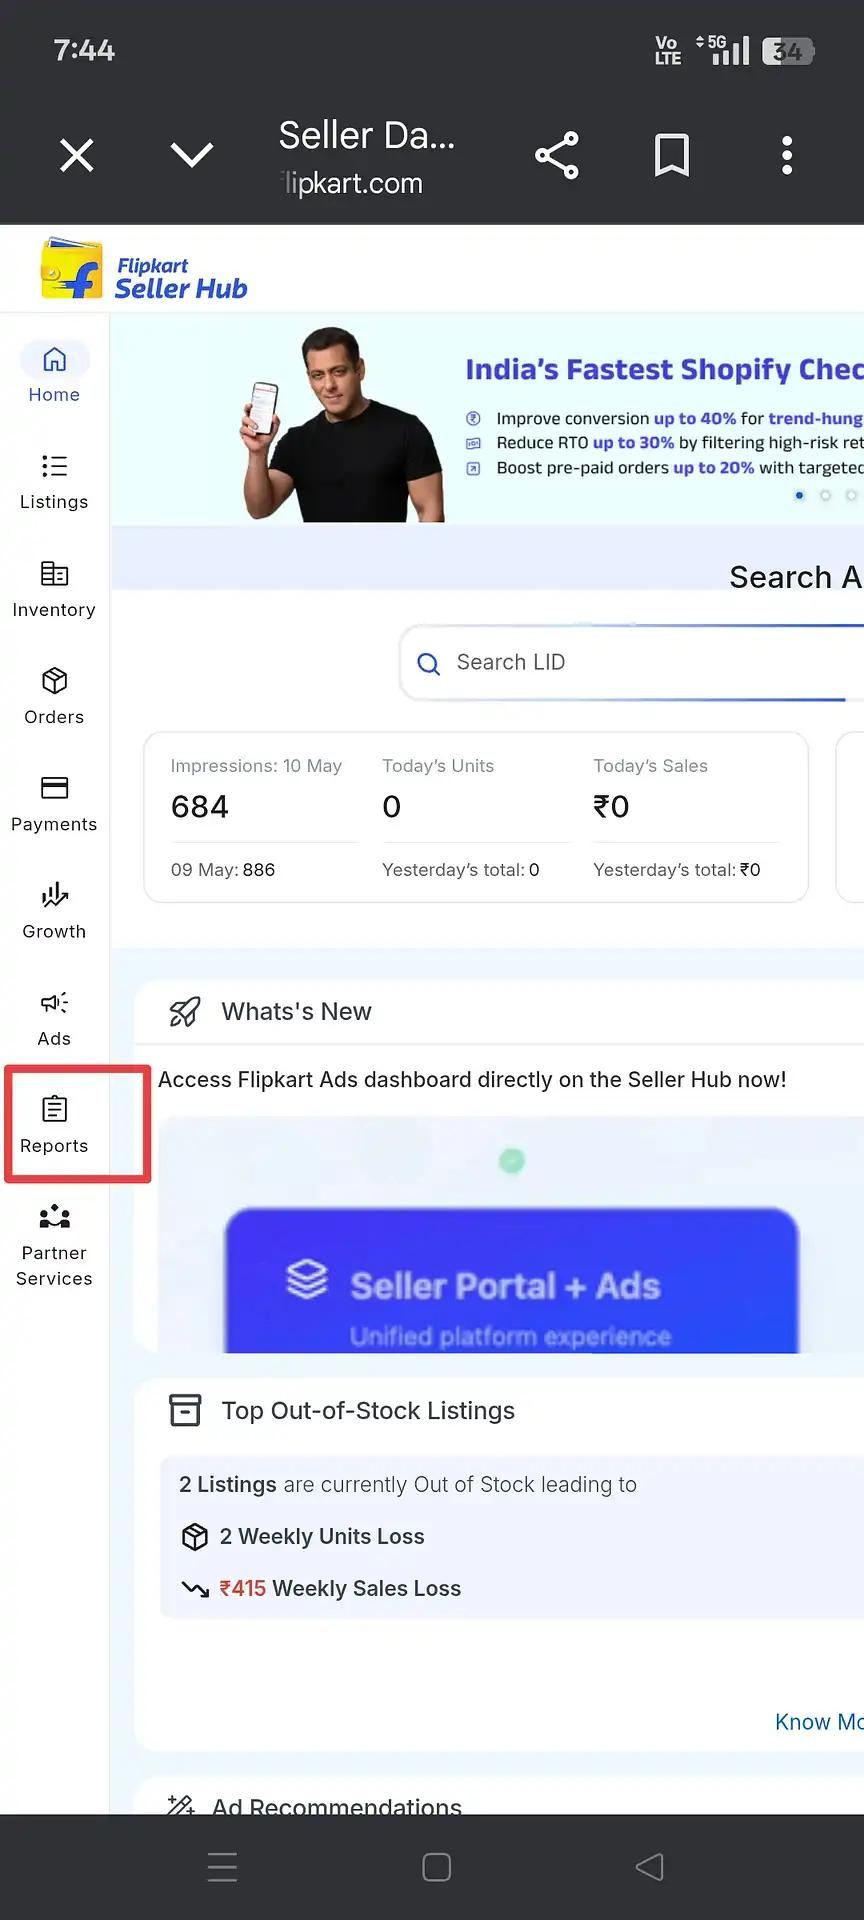
Log in to Flipkart Seller Hub and click Reports in the left navigation menu.
Step 11: Click Request New Report
On the Reports page, click the blue Request New Report button.
Step 12: Select Tax Reports → GSTR Return Report
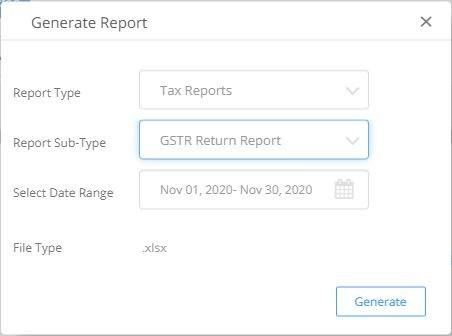
In the Generate Report popup:
- Report Type → Tax Reports
- Report Sub-Type → GSTR Return Report
- Select Date Range → the full filing month (e.g. 01 July to 31 July)
- Confirm the File Type is
.xlsx - Click Generate
Don't confuse this with the Sales Report: The Sales Report is an operational summary. The GSTR Return Report is the official statutory GST filing report, and it is the only one GSTWali parses for Flipkart.
Step 13: Wait, then download
Return to the Reports list. Your request will show as Pending or In Progress, and will change to Generated with a clickable Download link once ready. (Tip: Request this a few days before the 11th deadline to avoid month-end queue delays).
Part 4: Your Files Checklist
Before launching GSTWali, verify that you have collected:
- Meesho:
tcs_sales.xlsx,tcs_sales_return.xlsx, and (optional)Tax_invoice_details.xlsx - Amazon: MTR B2B and MTR B2C (
.xlsx/.csv) - Flipkart: GSTR Return Report (
.xlsx) - All spreadsheets belong to the same GSTIN and the same return month.
Part 5: Generate Your GSTR-1 JSON in GSTWali
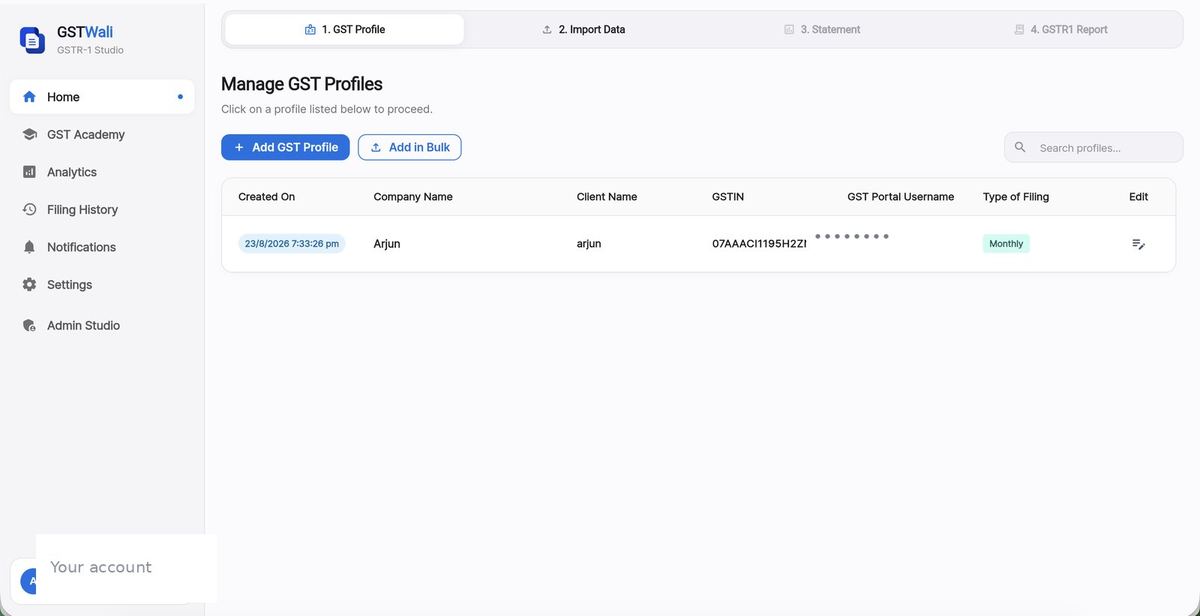
GSTWali runs as an intuitive four-step workflow: 1. GST Profile → 2. Import Data → 3. Statement → 4. GSTR1 Report.
Step 14: Set up your GST profile
Open gstwali.in and go to 1. GST Profile. Click Add GST Profile, enter your Trade Name, GSTIN, and Filing Frequency (Monthly or QRMP), and save it. Your profile is securely preserved for all future months.
Step 15: Upload your marketplace files
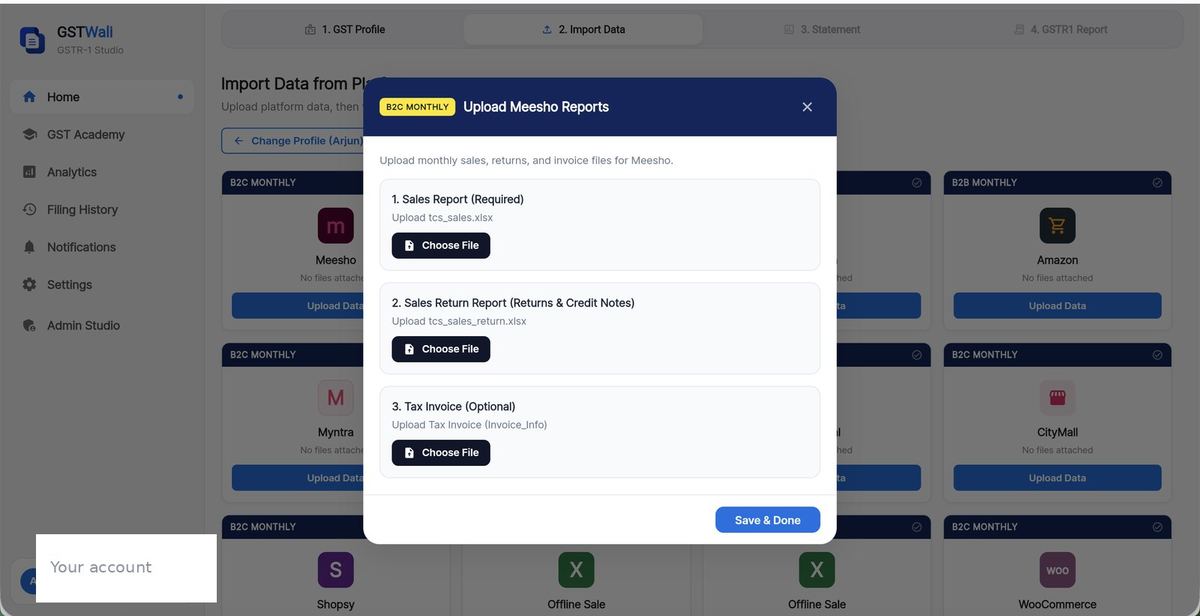
Navigate to 2. Import Data. You'll see dedicated cards for Meesho, Amazon, Flipkart, Myntra, Shopsy, and Offline Sales.
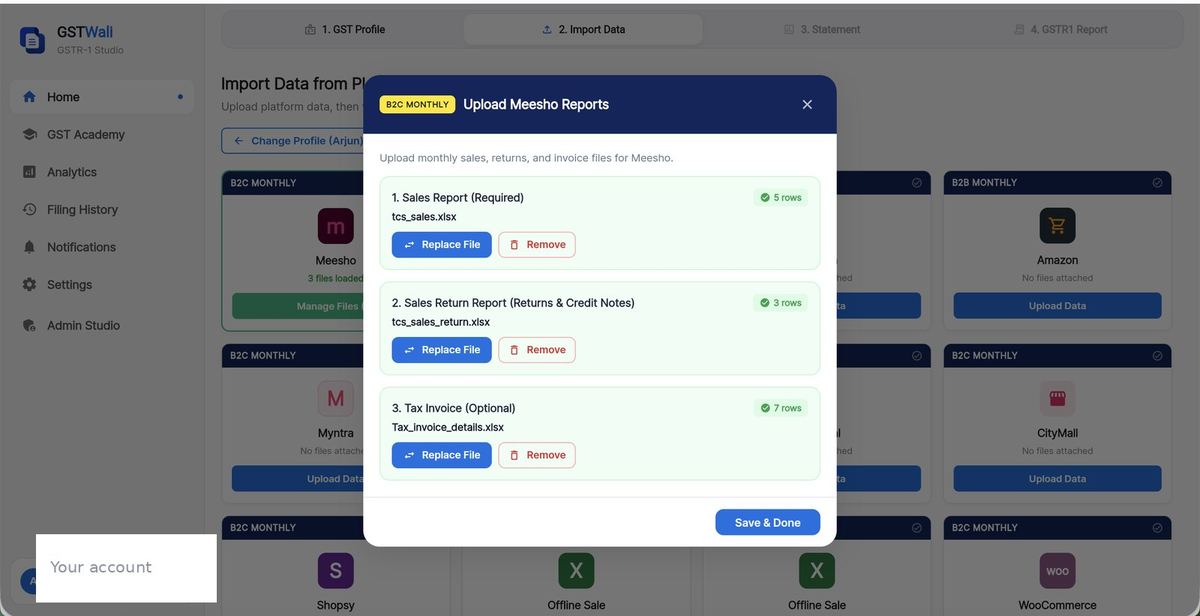
Click Upload Data on the Meesho card. Attach your three files to their designated slots:
- Sales Report (Required) →
tcs_sales.xlsx - Sales Return Report (Returns & Credit Notes) →
tcs_sales_return.xlsx - Tax Invoice (Optional) →
Tax_invoice_details.xlsx
Once attached, GSTWali instantly inspects each file and displays the parsed row counts. Click Save & Done, and repeat for your Amazon and Flipkart cards.
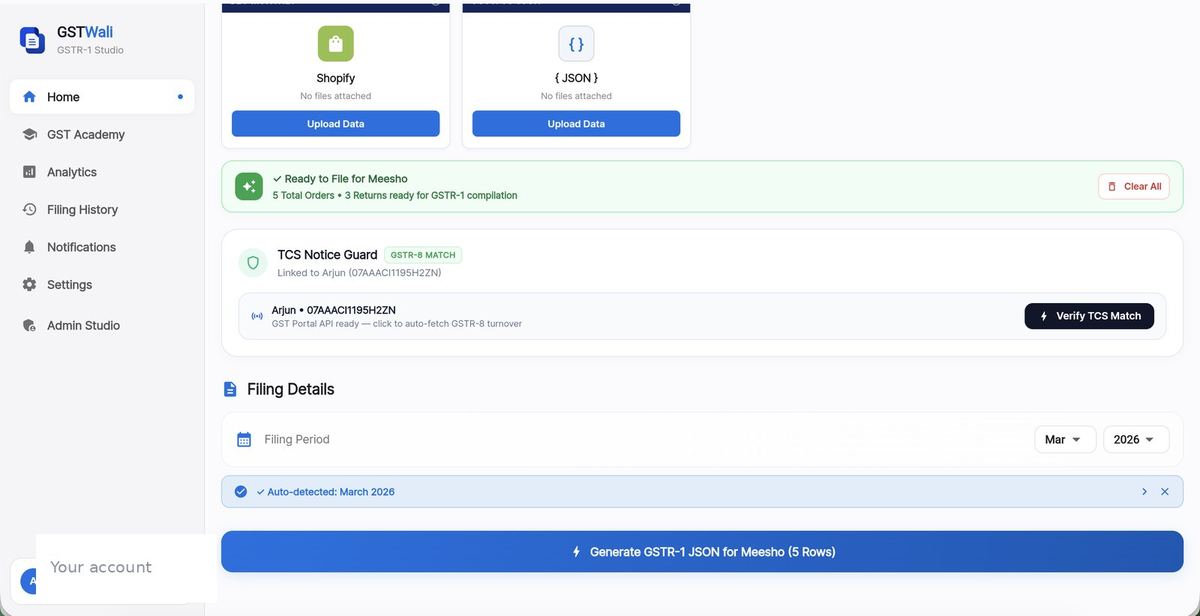
Step 16: Run the TCS reconciliation
Click Verify TCS Match. GSTWali's TCS Notice Guard compares your uploaded net sales against the marketplace GSTR-8 TCS records to ensure 100% reconciliation and eliminate mismatch notices.
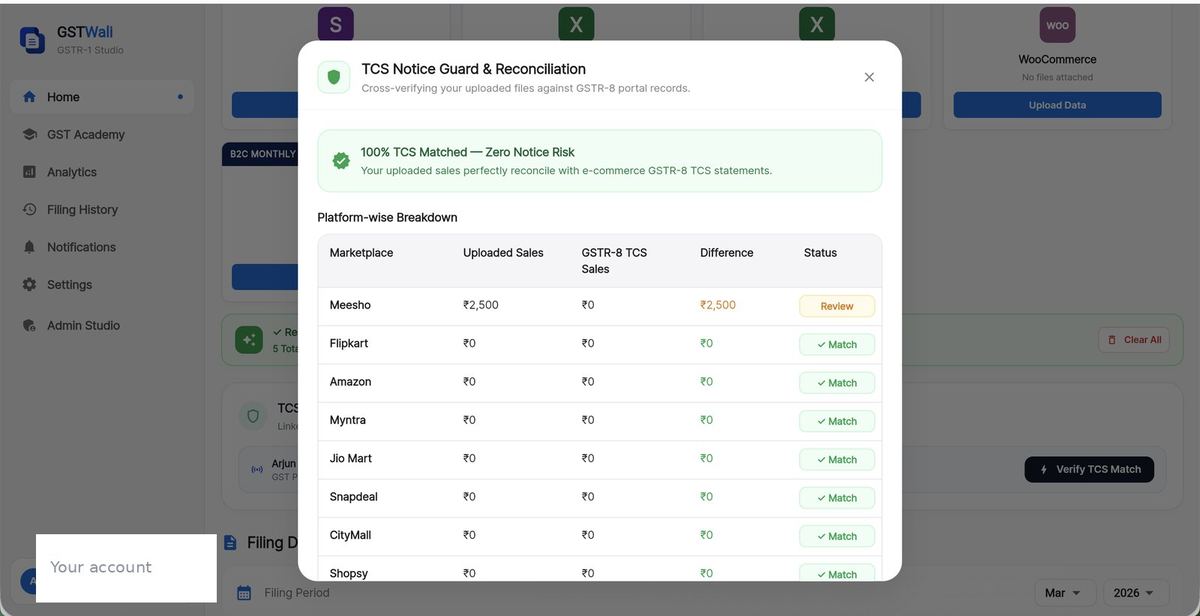
Why this matters: Marketplaces collect 0.5% TCS (0.25% CGST + 0.25% SGST, or 0.5% IGST) on your net sales. The GST department runs automated cross-checks between your GSTR-1 and the marketplace GSTR-8. Catching variances before filing protects you from automated DRC-01B queries.
Step 17: Generate the JSON
Verify your auto-detected filing period and order totals in the Ready to File summary, then click Generate GSTR-1 JSON.
Step 18: Review the Filing Statement & Audit Summary
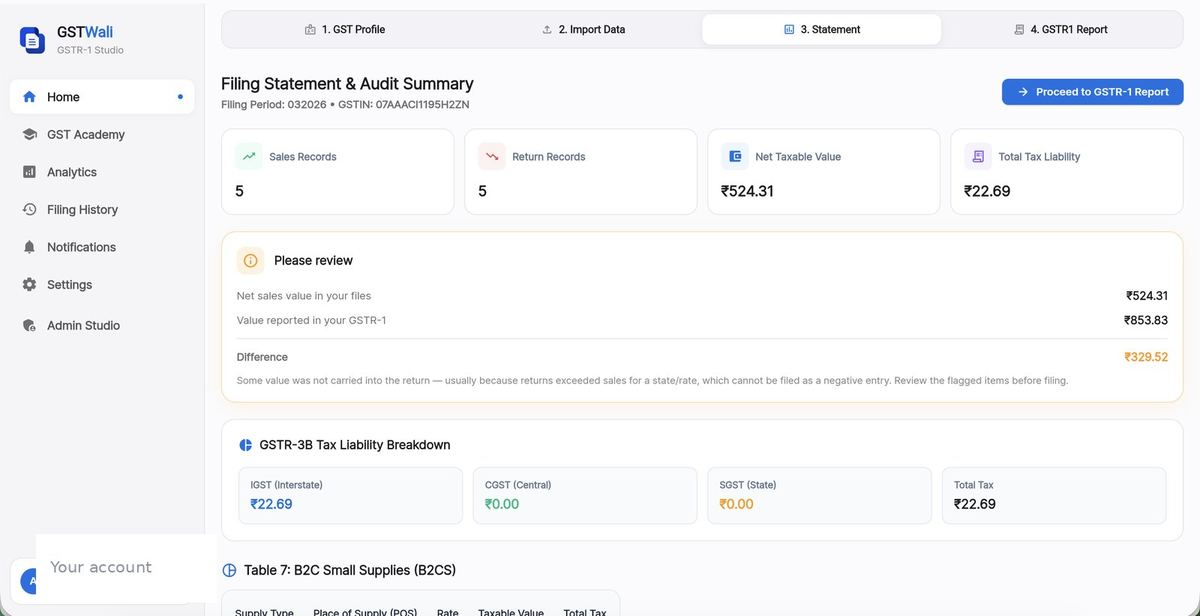
Go to 3. Statement. Here you get a complete reconciliation of Sales Records, Return Records, Net Taxable Value, and Tax Liability broken down by IGST, CGST, and SGST.
Step 19: Inspect Tables 7, 12, 13 and 14/15
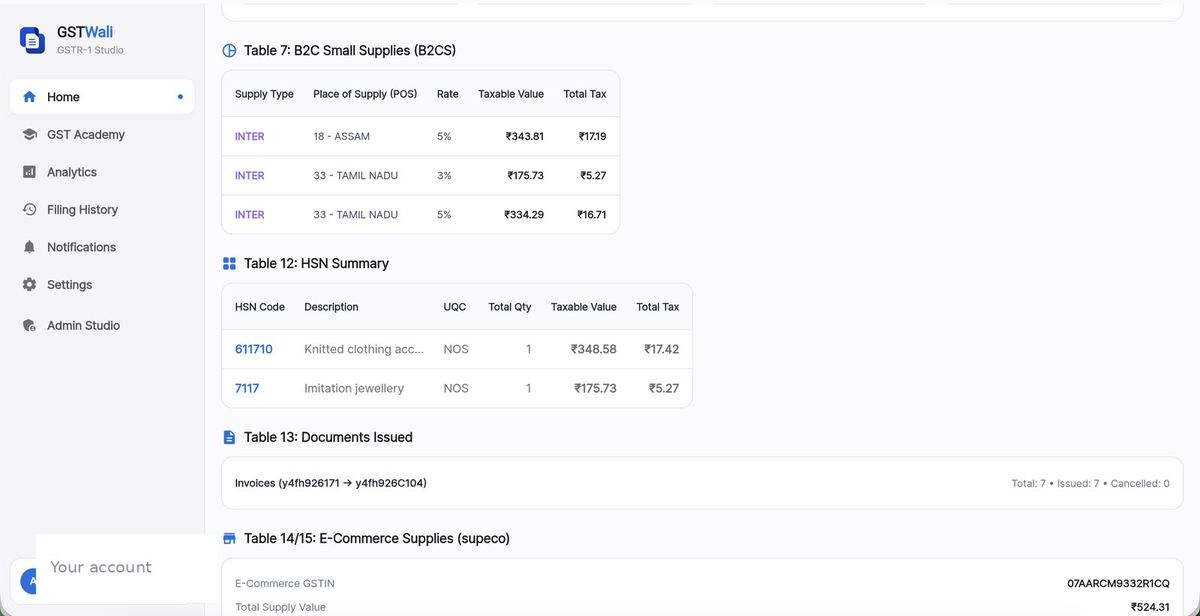
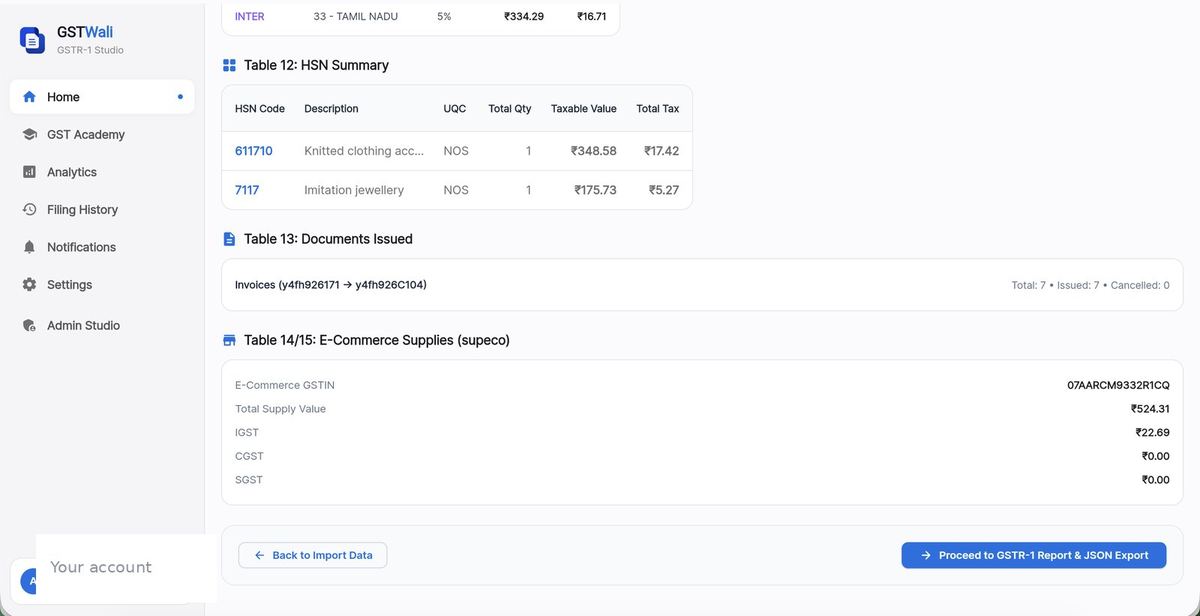
GSTWali groups your data into exact statutory GSTR-1 tables:
- Table 7 (B2CS): Aggregated by Place of Supply (State) and Tax Rate.
- Table 12 (HSN Summary): HSN Code, UQC, piece counts, taxable value, and tax breakdown.
- Table 13 (Documents Issued): Invoice series range and cancellation counts.
- Table 14/15 (E-Commerce Supplies): Marketplace ETINs (GSTINs) and supply values.
Step 20: Download the JSON & Excel Audit File
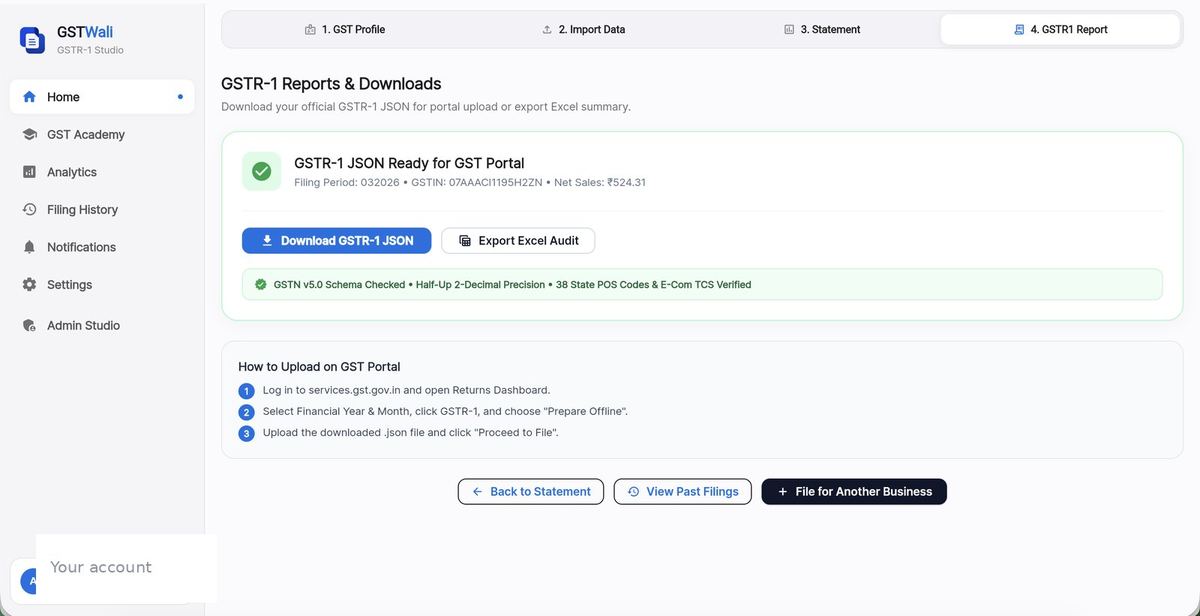
On 4. GSTR1 Report, click Download GSTR-1 JSON. You can also click Export Excel Audit to save a permanent spreadsheet copy for your accounting archives.
Part 6: Upload the JSON to gst.gov.in
Step 21: Log in and Open Returns Dashboard
Visit services.gst.gov.in, log in with your credentials, and navigate to Services → Returns → Returns Dashboard.
Step 22: Select Period
Select your Financial Year, Quarter, and Period (Month), then click Search.
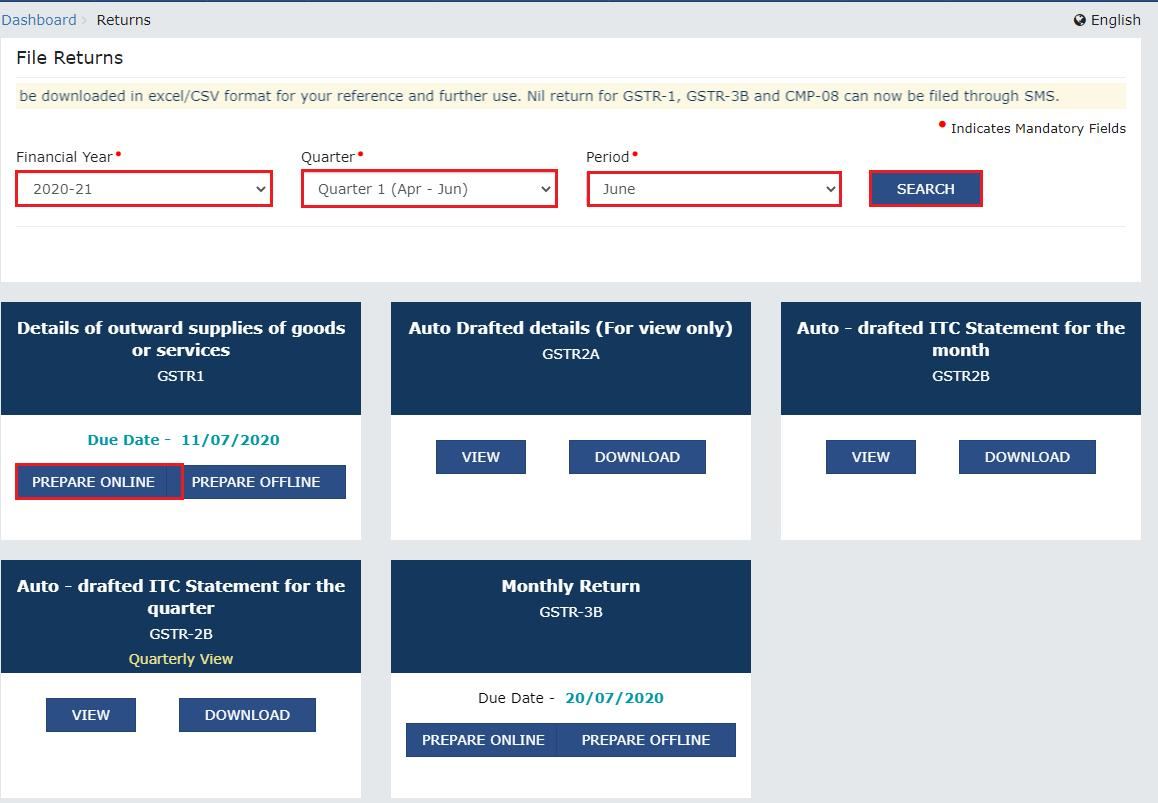
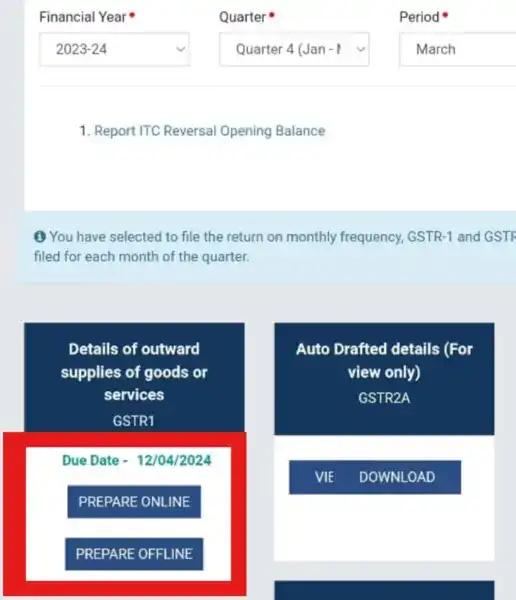
Step 23: Open GSTR-1 and Choose Prepare Offline
Under the GSTR-1 tile, click PREPARE OFFLINE (do not click Prepare Online for JSON uploads).
Step 24: Upload the JSON File
Click Choose File, select your downloaded GSTWali JSON file, and upload it. The status will initially read In Progress.
Step 25: Verify Processing Status
Refresh after 30–60 seconds. The status will update to Processed Successfully. If any schema error occurs, download the error JSON to view the exact invalid row.
Step 26: Generate Summary, Submit and File
- Click Generate GSTR-1 Summary.
- Preview the figures across Tables 7, 12, 13, and 14.
- Click Submit to freeze the data.
- Click File Return with EVC (enter Aadhaar OTP) or DSC to complete filing.
The Complete Monthly Workflow
| Platform / Step | Where to Go | Output Files / Action |
|---|---|---|
| Meesho | Payments → Download → GST Report & Tax Invoice | tcs_sales.xlsx, tcs_sales_return.xlsx, Tax_invoice_details.xlsx |
| Amazon | Reports → Tax Document Library → MTR | MTR B2B + MTR B2C (.xlsx / .csv) |
| Flipkart | Reports → Request New Report → GSTR Return Report | GSTR Return Report (.xlsx) |
| GSTWali | GST Profile → Import Data → Statement → Report | Reconcile TCS, review tables, download GSTR-1 JSON |
| GST Portal | Returns Dashboard → GSTR-1 → Prepare Offline | Upload JSON → Generate Summary → Submit → File with OTP |
E-Commerce GST Filing Checklist
Before Generating the JSON
- Correct GSTIN and return month selected
- Meesho sales and return files downloaded
- Amazon B2B and B2C MTR files downloaded
- Flipkart GSTR Return Report downloaded
- Row counts verified upon upload
- TCS Notice Guard reconciliation reviewed
- Table 12 HSN classification verified
- Table 13 invoice document series verified
After Uploading to GST Portal
- Upload status shows "Processed Successfully"
- GSTR-1 summary generated and values cross-checked
- Return submitted
- Return filed with Aadhaar OTP (EVC) or DSC
Generate Your GSTR-1 JSON in Under 2 Minutes
Upload your Meesho, Amazon, and Flipkart reports into GSTWali. Get instant multi-platform consolidation, automated return netting, and a 100% portal-compliant JSON file.
Generate GSTR-1 JSON →Frequently Asked Questions
How many Meesho files do I need?
Two are required — TCS Sales (tcs_sales.xlsx) and TCS Sales Return (tcs_sales_return.xlsx). The Tax Invoice Details file (Tax_invoice_details.xlsx) is optional but recommended, since it fills your Table 13 document summary properly.
Can I file one GSTR-1 for Meesho, Amazon and Flipkart together?
Yes, provided all the transactions belong to the same GST registration and the same return period. GSTWali consolidates them into a single GSTR-1 with platform-wise Table 14 breakdowns.
Do I have to enter every marketplace order manually?
No. Marketplace reports are automatically aggregated into the GSTR-1 statutory tables (Table 7 B2CS by Place of Supply and Rate), and GSTN provides an offline JSON upload route for fast filing.
What if the GST Portal rejects my JSON?
Download the error report from the GST portal offline upload history, identify the failing records, correct the source data, regenerate the JSON in GSTWali and upload again.
Can I upload just the Meesho sales report and skip returns?
No. Returns reduce your net taxable turnover. Filing sales without returns means overpaying GST, and your figures will not match the marketplace GSTR-8 report.
Why does my TCS not match my sales?
Timing differences are common — an order placed at month-end may settle in the next month. Small gaps are normal. Large or unexplained gaps trigger notices, so investigate before filing.
Does uploading the JSON file my return?
No. Uploading only loads the data. You must review the summary on the GST portal, click Submit (which freezes data), and finally click File Return with DSC or EVC (Aadhaar OTP).
Read next
The Complete GSTR-1 Guide for eCommerce SellersTables, due dates and the Rule 88C trap Selling on Multiple Marketplaces — One GST ReturnConsolidating Meesho, Amazon, Flipkart into one return TCS Under GST Explained for Online SellersUnderstanding deductions and cash ledger recovery How to Find Correct HSN Codes for Meesho & FlipkartPrevent Table 12 classification errors GST Academy & 78-Question FAQ HubInteractive lessons and symptom-based error troubleshooting